
Looped Christmas Tree Crochet Pattern
- Regina P

- Oct 28, 2025
- 3 min read
Updated: Mar 20
It's that time of year again where I spend weeks trying to create new ornaments for my big craft show of the year! This super simple ornament just happened while I was doodling during bible study.

" Work these cute looped trees up quickly with the scraps you have on hand and spruce up your tree or packages with a handmade addition this holiday season. Finished tree should measure approximately 4” tall depending on your yarn of choice and tension."
Here's what you'll need to get started.......
Materials:
Red Hear Super Saver Yarn(approx. 25 yds)
G(Boye 4.25 mm) Hook
Scissors
Needle
Small Star Button
14” Jute Twine
Abbreviations(US Terms):
SK = Skip
sts = Stitches
ST = Stitch
SL= Slip Stitch
CH = Chain
SC = Single Crochet
HDC = Half Double Crochet
By using any Regina P Designs patterns, you agree to the terms of use:
-All Regina P Designs Patterns are for personal use only.
-It is prohibited to: reproduce, copy, publish(in any Form including video) or distribute this pattern, its parts or photos in any way or form, including translations into foreign languages.
-You are free to do as you wish with the finished products made from these patterns with the agreement that Regina P Designs will be credited for the pattern itself & you take on the responsibility as the manufacturer of your tangible creation.
NOTES: Feel free to use any WW4/Aran/10 ply yarn you have on hand to create these ornaments.
To begin CH 15
ROW 1: HDC in the 2nd CH from your hook & in each CH across(14)
ROW 2(right Side): CH 1(does not count as a ST) & Turn, SC in the first 2 sts,
CH 4, 🔸(SL in the same ST, SC in the next 2 sts)🔹,
CH 6, repeat 🔸 to 🔹,
CH 8, repeat 🔸 to 🔹,

CH 10, repeat 🔸 to 🔹,
CH 12, repeat 🔸 to 🔹,
CH 14, SL in the same ST, SC in the next ST, place 3 SC in the last ST & rotate to work along the bottom of your starting CH,
SC in the next 2 CHs,
CH 14, repeat 🔸 to 🔹,

CH 12, repeat 🔸 to 🔹,
CH 10, repeat 🔸 to 🔹,
CH 8, repeat 🔸 to 🔹,
CH 6, repeat 🔸 to 🔹,
CH 4, SL in the same CH, SC in the last CH, SL in the CH 1 from the start of the row, Cut & tie off

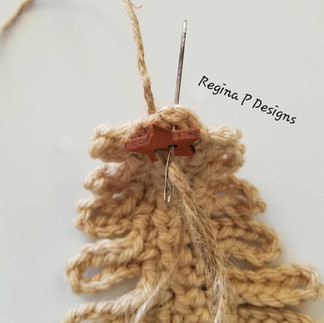
Weave in your ends. Feed your Jute through the star button & through the top of the tree. Tie a knot jut above the tree and another at the top of the twine to create your hanger.


DON'T FORGET to check out this month's

IMPORTANT NOTICE:
Thanks to the new GPSR laws you must now be a Site Member to access the store at Reginapdesigns.com and make a purchase, FREE or Paid. The only way I can find to continue offering FREE to view patterns on my Blog while still having a store front is to make my shop private to only members and screen each member by Country of residence before approving them. Customers from Northern Ireland & European Union Countries need not apply. These new GPSR laws do not allow me to sell digital downloads to any residents of these countries, so they will not be approved for membership. Sorry for the inconvenience, and please be patient with me as I try to comply with these new laws and still maintain my small business.
Regina P.


Comments