Gio Stitch Washcloth Pattern
- Regina P

- Feb 23, 2022
- 3 min read
Updated: Dec 13, 2024
So, I'm a little obsessed with my Gio Stitch design! My biggest fan(my amazing hubby) happens to have a birthday in March, so I decided to create a washcloth. It may sound weird BUT he actually enjoys doing the dishes and ALWAYS must use one of my(or Cro-Shake's) handmade cloths when he does. Yeah, he's pretty great!
.

Here's what you'll need to get started:
I used Mainstays cotton to create this pattern for an upcoming E-Book idea I have in the works & because I LOVE it. Feel Free to change it up & use whatever you like the most.
Materials:
Mainstays 100% Cotton Yarn(approx. 52 yds total)
G(Boye 4.25mm) Hook
Scissors
Needle

Abbreviations(US Terms):
SK = Skip
sts = Stitches
CH = Chain
SC = Single Crochet
DC = Double Crochet
FPSC = Front Post Single Crochet
CH 3 gap = The loop created during the “CH3, place 1 FPSC around the 2 DC sts”
NOTES:
- you can adapt this pattern to any size by chaining any multiple of 3.
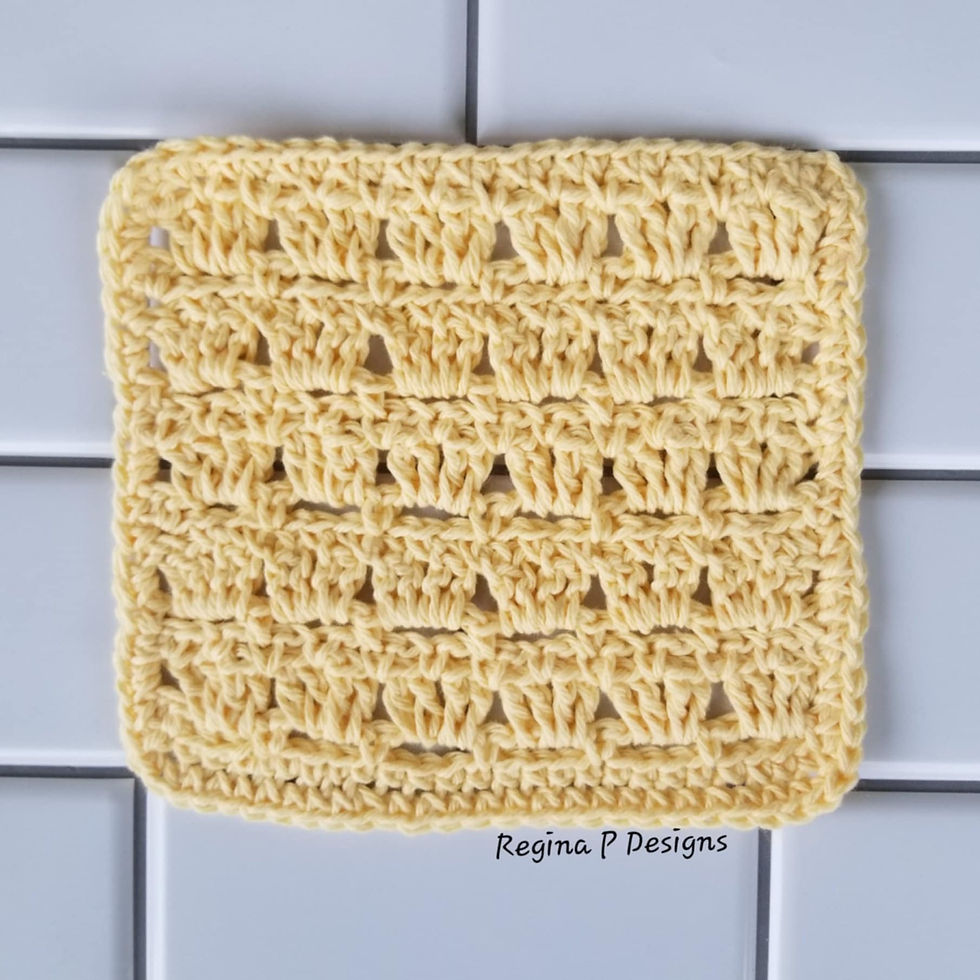
- Finished washcloth with this pattern should measure approx. 7.5” wide by 7” tall.
- I've created a video to explain the “place 1 FPSC around the 2 DC sts” step of the pattern for help. You can find the link to the video in any of my Gio pattern PDF files.
To begin CH 33
ROW 1: DC in the 4th CH from your hook & in the next ST, CH3, place 1 FPSC around the 2 DC sts, SK 1, repeat(DC in the next 2 sts, CH3, place 1 FPSC around the 2 DC sts, SK 1) 9 times, DC in the last ST
ROW 2: CH 3(counts as your first ST) & turn, repeat(place 2 DC in the CH 3 gap, CH3, place 1 FPSC around the 2 DC sts) 10 times, DC in the top of your beginning CH 3
Repeat (ROW 2) 8 more times for a total of 10 rows.
TRIM:
CH 3(counts as your first ST) & turn, place 2 SC in the CH 3 gap, repeat(CH 1, place 2 SC in the CH 3 gap) 10 times, DC in the top of your beginning CH 3(31 sts), CH 1
ROTATE to work along the row ends, place 2 SC/CH1 in every ROW end(33 sts)
ROTATE to work along the bottom, place 1 SC in the same CH gap as your last 2 SC, CH 1, place 2 SC/CH1 in the next 9 gaps(the skipped CH SP)(29 sts),
ROTATE to work along the row ends, place (SC, CH 1, 2SC, CH 1) in the first row end, place 2 SC/CH1 in every ROW end(35 sts), SL to the 3rd CH of your beginning CH 3 to connect. Cut, tie off, and weave in your ends.

BEFORE YOU GO..........................
PLEASE take a minute &

If you have any questions about this pattern or any of the other patterns from Regina P Designs, or want to show off your finished projects with our patterns, please join our Facebook Group.
Please favorite this pattern & add your projects on Ravelry HERE
DON'T FORGET to check out this month's
Available NOW HERE
or
in my Ravelry Store HERE
By using any Regina P Designs patterns, you agree to the terms of use:
All Regina P Designs Patterns are for personal use only.
It is prohibited to: reproduce, copy, publish(in any Form including video) or distribute this pattern, its parts or photos in any way or form, including translations into foreign languages.
You are free to do as you wish with the finished products made from these patterns with the agreement that Regina P Designs will be credited for the pattern itself.
Copyright 2023, Regina P Designs All Rights Reserved. All Content Copyright and other rights reserved by Regina P Designs. No Content May Be Duplicated Without Express Written Consent.


Comments